
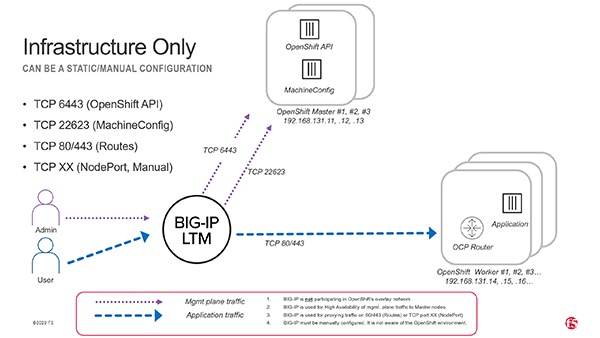
When running OpenShift 4.19 on bare-metal or private cloud, you need reliable load balancers for critical cluster endpoints:
- API VIP (port
6443) - Machine Config Server VIP (port
22623, only required during install) - Ingress/Apps VIP (ports
80and443)
This guide walks through setting up F5 BIG-IP appliances in active/standby HA mode to provide these VIPs using a one-arm SNAT Automap configuration.
1. Pre-requisites
Before you start:
- Define your platform VLANs and assign IPs to BIG-IP devices.
- Configure DNS for
api.<cluster>.<domain>and*.apps.<cluster>.<domain>. - Ensure your BIG-IP devices can reach the OpenShift nodes (masters, workers, or infra nodes).
2. Base Network Setup
On each BIG-IP device, create a self IP and default route:
tmsh create net self 192.168.16.40/24 vlan internal allow-service default
tmsh create net route default gw 192.168.16.1
tmsh save sys config
Verify:
tmsh list net self
tmsh list net route
tmsh show net interface
tmsh show net arp
3. Hostnames and Config-Sync IPs
Run the following on each device (bigip-0 and bigip-1). Adjust hostnames and self IPs:
# Set hostname
tmsh modify sys global-settings hostname bigip-0.xmen.kubernetes.day
tmsh save sys config

# Self IP (per device)
# bigip-0 192.168.16.40 ; bigip-1 192.168.16.41
tmsh create net self 192.168.16.40/24 vlan internal allow-service default

# Config-sync IP (per device)
tmsh create net self 192.168.16.70/24 vlan internal allow-service default
tmsh modify sys cm device bigip-0.xmen.kubernetes.day configsync-ip 192.168.16.70
tmsh modify sys cm device bigip-0.xmen.kubernetes.day unicast-address { { ip 192.168.16.70 } }

tmsh save sys config
tmsh list cm device bigip-0.xmen.kubernetes.day
4. Device Trust
Easiest path: GUI → Device Management → Device Trust → Device Trust Members.
Add the peer device using its config-sync IP and admin credentials.
CLI option:
tmsh modify cm trust-domain Root ca-devices add { bigip-1.xmen.kubernetes.day } username admin password <password>
tmsh list cm trust-domain Root
tmsh show cm device
5. HA Device Group
Create HA group, initiate full sync, then enable auto-sync:
tmsh create cm device-group ocp-ha type sync-failover auto-sync disabled network-failover enabled full-load-on-sync true devices add { bigip-0.xmen.kubernetes.day bigip-1.xmen.kubernetes.day }
tmsh run cm config-sync force-full-load-push to-group ocp-ha
tmsh modify cm device-group ocp-ha auto-sync enabled full-load-on-sync false save-on-auto-sync true
tmsh show cm device-group ocp-ha
tmsh show sys failover
Switch roles if needed:
tmsh run sys failover standby
tmsh run sys failover active
6. Health Monitors
Create monitors for API and Router:
# API readiness (/readyz → "ok")
tmsh create ltm monitor https ocp_api_hc defaults-from https send "GET /readyz HTTP/1.1\r\nHost: api.xmen.kubernetes.day\r\nConnection: close\r\n\r\n" recv "ok"

# Router health (/healthz → "ok")
tmsh create ltm monitor http ocp_router_http_hc defaults-from http send "GET /healthz HTTP/1.1\r\nHost: probe\r\nConnection: close\r\n\r\n" recv "ok"
7. Pools
Map pools to your cluster nodes:
# Masters: API + MCS
tmsh create ltm pool ocp_api_pool monitor ocp_api_hc members add { 192.168.16.120:6443 192.168.16.121:6443 192.168.16.122:6443 }
tmsh create ltm pool ocp_mcs_pool monitor tcp members add { 192.168.16.120:22623 192.168.16.121:22623 192.168.16.122:22623 }

# Workers: Apps
tmsh create ltm pool ocp_apps_http_pool  monitor ocp_router_http_hc members add { 192.168.16.130:80 192.168.16.131:80 192.168.16.132:80 }
tmsh create ltm pool ocp_apps_https_pool monitor tcp                members add { 192.168.16.130:443 192.168.16.131:443 192.168.16.132:443 }
If your router pods run on infra nodes instead, swap pool members accordingly.
8. Virtual Servers
Expose the VIPs (disable the MachineConfigServer after installation – see step 9):
# API VIP
tmsh create ltm virtual vs_api_6443  destination 192.168.16.50:6443 ip-protocol tcp pool ocp_api_pool  source-address-translation { type automap } profiles add { tcp }

# MachineConfigServer (install only)
tmsh create ltm virtual vs_mcs_22623 destination 192.168.16.50:22623 ip-protocol tcp pool ocp_mcs_pool source-address-translation { type automap } profiles add { tcp }

# Apps VIP
tmsh create ltm virtual vs_apps_80   destination 192.168.16.60:80  ip-protocol tcp pool ocp_apps_http_pool  source-address-translation { type automap } profiles add { tcp http }
tmsh create ltm virtual vs_apps_443  destination 192.168.16.60:443 ip-protocol tcp pool ocp_apps_https_pool source-address-translation { type automap } profiles add { tcp }

# Floating VIPs
tmsh modify ltm virtual-address 192.168.16.50 traffic-group traffic-group-1 arp enabled icmp-echo enabled
tmsh modify ltm virtual-address 192.168.16.60 traffic-group traffic-group-1 arp enabled icmp-echo enabled
tmsh save sys config
9. Post-Install Cleanup
After cluster install, disable MCS:
tmsh modify ltm virtual vs_mcs_22623 disabled
# or delete it
tmsh delete ltm virtual vs_mcs_22623
tmsh delete ltm pool ocp_mcs_pool
10. Health Checks
tmsh show ltm pool ocp_api_pool members
tmsh show ltm pool ocp_apps_http_pool members
tmsh show ltm virtual vs_api_6443
tmsh show sys failover
From Client:
openssl s_client -connect 192.168.16.50:6443 -servername api.xmen.kubernetes.day -brief
curl -s -o /dev/null -w "%{http_code}\n" http://192.168.16.60/healthz
or just try oc get nodes.
Other Monitoring Considerations
Depending on how your OpenShift Router pods are configured, you may want to adjust health monitoring for the Ingress/Apps VIPs.
Option A: Monitor /healthz on Port 1936
The router pods expose a dedicated admin/metrics port 1936 that responds cleanly to /healthz.
This is more accurate than probing the edge ports directly (80/443).
tmsh create ltm monitor http ocp_router_hc_1936 defaults-from http destination *:1936 send "GET /healthz HTTP/1.1\r\nHost: localhost\r\nConnection: close\r\n\r\n" recv "ok"

tmsh modify ltm pool ocp_apps_http_pool  monitor ocp_router_hc_1936
tmsh modify ltm pool ocp_apps_https_pool monitor ocp_router_hc_1936

tmsh save sys config
tmsh run cm config-sync to-group ocp-ha
Option B: Use TCP Monitors on 80/443
If you want the simplest and most resilient option, just check that the TCP handshake works on the router’s public ports (80 and 443).
This avoids false negatives from HTTP probes but does not verify HTTP response codes:
tmsh modify ltm pool ocp_apps_http_pool  monitor tcp
tmsh modify ltm pool ocp_apps_https_pool monitor tcp
tmsh save sys config
Recommendation Matrix
| Scenario | Recommended Monitor | Why |
|---|---|---|
| Strict health validation (need to confirm router process is healthy, not just port open) | /healthz on 1936 | Ensures the router pod itself reports healthy; avoids false positives when the port is open but pod is unresponsive. |
| Production stability focus (avoid false negatives during reloads/503s) | TCP on 80/443 | Very reliable; only checks socket availability, minimizes risk of VIPs flapping due to transient HTTP errors. |
| Hybrid / mixed environments (Infra + Worker nodes, frequent scaling) | Start with 1936, fall back to TCP | Use /healthz if you control router pod placement; switch to TCP if you see repeated false alarms. |
Closing Thoughts
With these steps, your F5 BIG-IP pair provides highly available load balancing for OpenShift 4.19’s critical endpoints. The one-arm SNAT Automap design simplifies integration while still allowing full HA failover.
This configuration is suitable for lab, PoC, or production environments – just remember to harden your BIG-IP management plane and sync policies before going live.