
I simulated a disk failure on ODF by detaching one of the disk forcefully. And warnings came up immediately as you can see in my screenshot.
You can also check ceph -s for more detailed error.
➜  odf oc rsh deploy/rook-ceph-tools ceph -s
  cluster:
    id:     5e62bf6d-d973-4d01-a28d-0e1f97aad40c
    health: HEALTH_WARN
            1 osds down
            1 host (1 osds) down
            Degraded data redundancy: 66/297 objects degraded (22.222%), 42 pgs degraded, 74 pgs undersized
            1 daemons have recently crashed

  services:
    mon: 5 daemons, quorum a,b,c,d,e (age 106m)
    mgr: a(active, since 105m), standbys: b
    mds: 1/1 daemons up, 1 hot standby
    osd: 5 osds: 4 up (since 70s), 5 in (since 111m)

  data:
    volumes: 1/1 healthy
    pools:   4 pools, 113 pgs
    objects: 99 objects, 157 MiB
    usage:   437 MiB used, 250 GiB / 250 GiB avail
    pgs:     66/297 objects degraded (22.222%)
             42 active+undersized+degraded
             39 active+clean
             32 active+undersized

  io:
    client:   1.2 KiB/s rd, 3.3 KiB/s wr, 2 op/s rd, 0 op/s wr

➜  odf
Following the guide, I found osd=0 crashed, which is expected behaviour.

Scaled down the OSD deployment to remove the pod holding on to the osd, and reviewed my ceph health,
# osd_id_to_remove=0
# oc scale -n openshift-storage deployment rook-ceph-osd-${osd_id_to_remove} --replicas=0
NS=openshift-storage
oc -n $NS rsh deploy/rook-ceph-tools ceph -s
oc -n $NS rsh deploy/rook-ceph-tools ceph pg stat
oc -n $NS rsh deploy/rook-ceph-tools ceph osd tree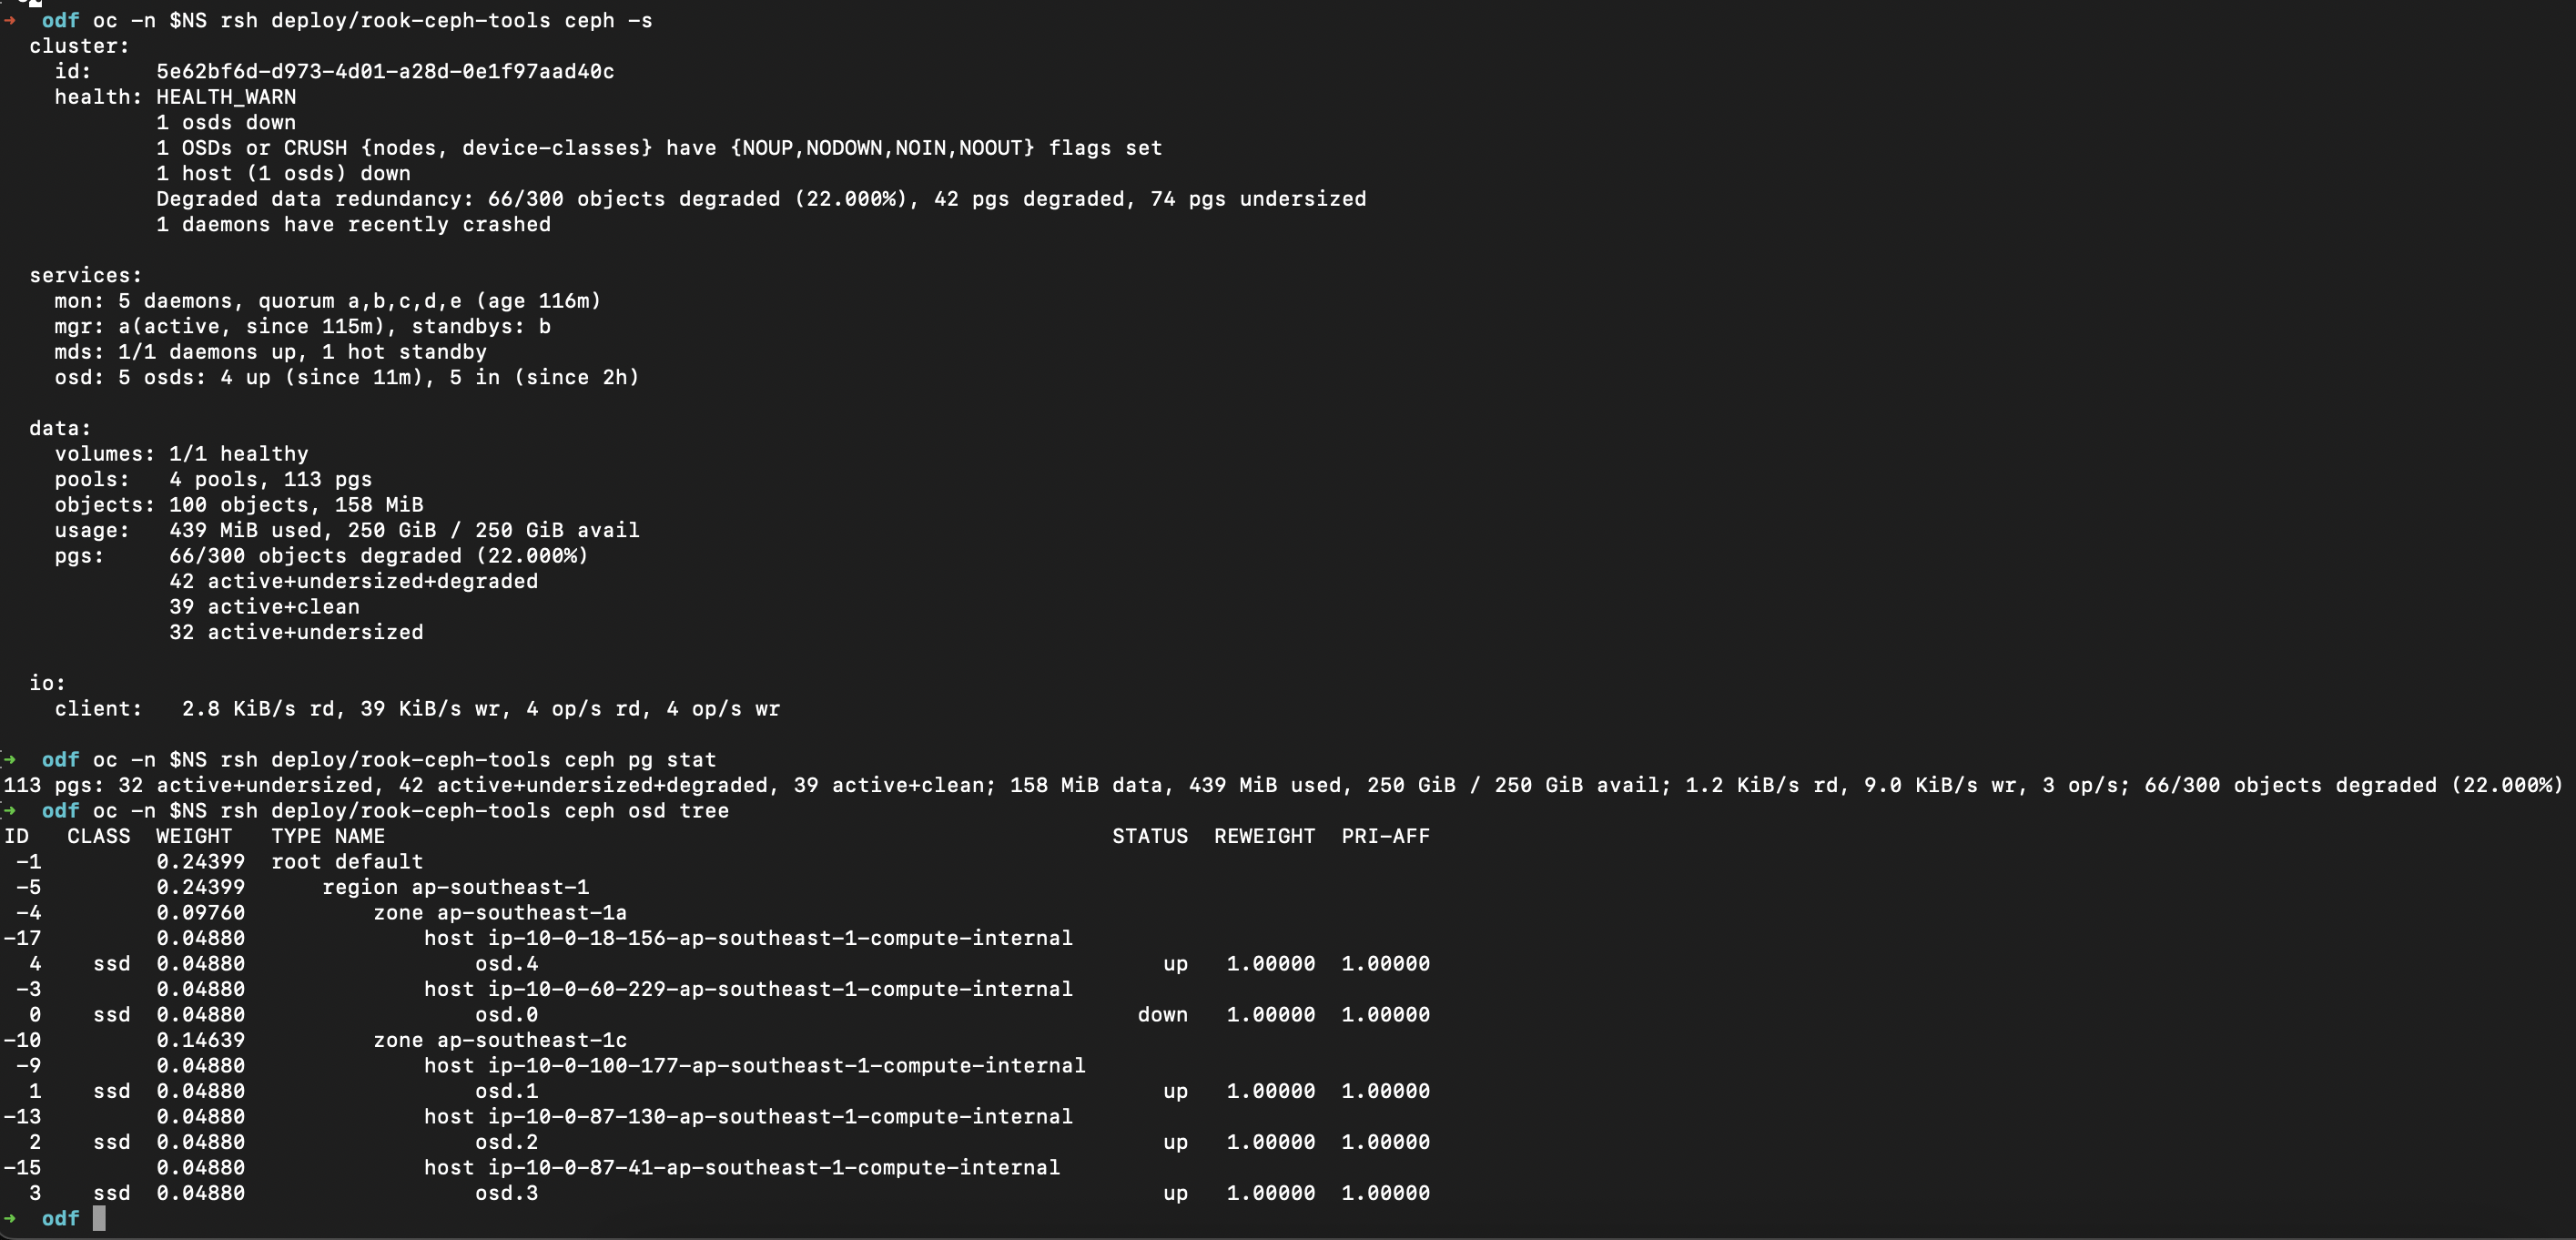
ceph pg stats(placement group) should show 113 active+clean (your numerical value is different), and this is important because it represents your replicas are balanced across the remaining OSDs. We want to make sure that ODF has already protected the objects by rebalancing them in the surviving disks. The compute resources will be less intensed too.
As you can see, my pgs are rebalancing as shown in the screenshot.
- active+degraded = not all replicas are available yet.
- active+clean = all replicas (3/3) are present and in sync. this is what ODF is aiming to have all the time.
- active+undersized = your pool is aiming to have 3 replicas, but found only 2 OSDs hosting them. this will force OSD to replicate to another surviving disk to maintain (3/3) replicas.
- active+undersized+degraded = not only replicas are missing, ceph can’t find enough OSDs to even begin repairing.
- active+repairing/backfilling = healing the PGs after a failure
- active = means the object is still served actively from primary object.
The script ./stitch.sh from my other blogpost was able to help me map OSD -> PV -> PVC -> node -> OSD utilization, to identify what I needed to manually remove. Thus I deleted the pvc & pv manually.
The odd part is I didn’t see a job-removal where it was supposed to do a removal of the OSD. So I also had to manually do a ceph osd out 0. I only figured out I had to do this step from the guide.
oc -n $NS rsh deploy/rook-ceph-tools ceph osd out <OSD_ID>Also, make sure that your ceph pg stat is showing your replicas are already balanced before you attempt the next step.
oc -n $NS rsh deploy/rook-ceph-tools ceph pg statRecovery – Add New Disk
I started attaching a disk to simulate disk replacement. Local Storage Operator (LSO) was also able to help discover & create a new PV on the fly. This is because of LocalVolumeDiscovery that was created prior to installation of ODF 4.16, and it discovered a new disk added into the same node that had a disk failure.

In later versions of ODF, the installation was a breeze, I didn’t recall I needed to setup LSO/LVM manually.
Take note that since non-LSO device size limit is 4TB, you need to use LSO if you want to use disk larger than 4TB. And if you want to use larger than ~12TB, reach out to Red Hat support for confirmation too. IIRC, there’s nothing in upstream or downstream that hardcoded ~12TB limit.
Usually ODF should pick up this within minutes, but in my case it did not in ODF 4.16.x. I ran the following to trigger a reconciliation immediately. For the curious folks, you can go through the pod logs to see it happen.
oc delete -n openshift-storage deployment rook-ceph-osd-0
deployment.apps "rook-ceph-osd-0" deleted
oc -n openshift-storage rollout restart deploy/rook-ceph-operatorand i ran ceph -s and ceph osd tree again. There we go.
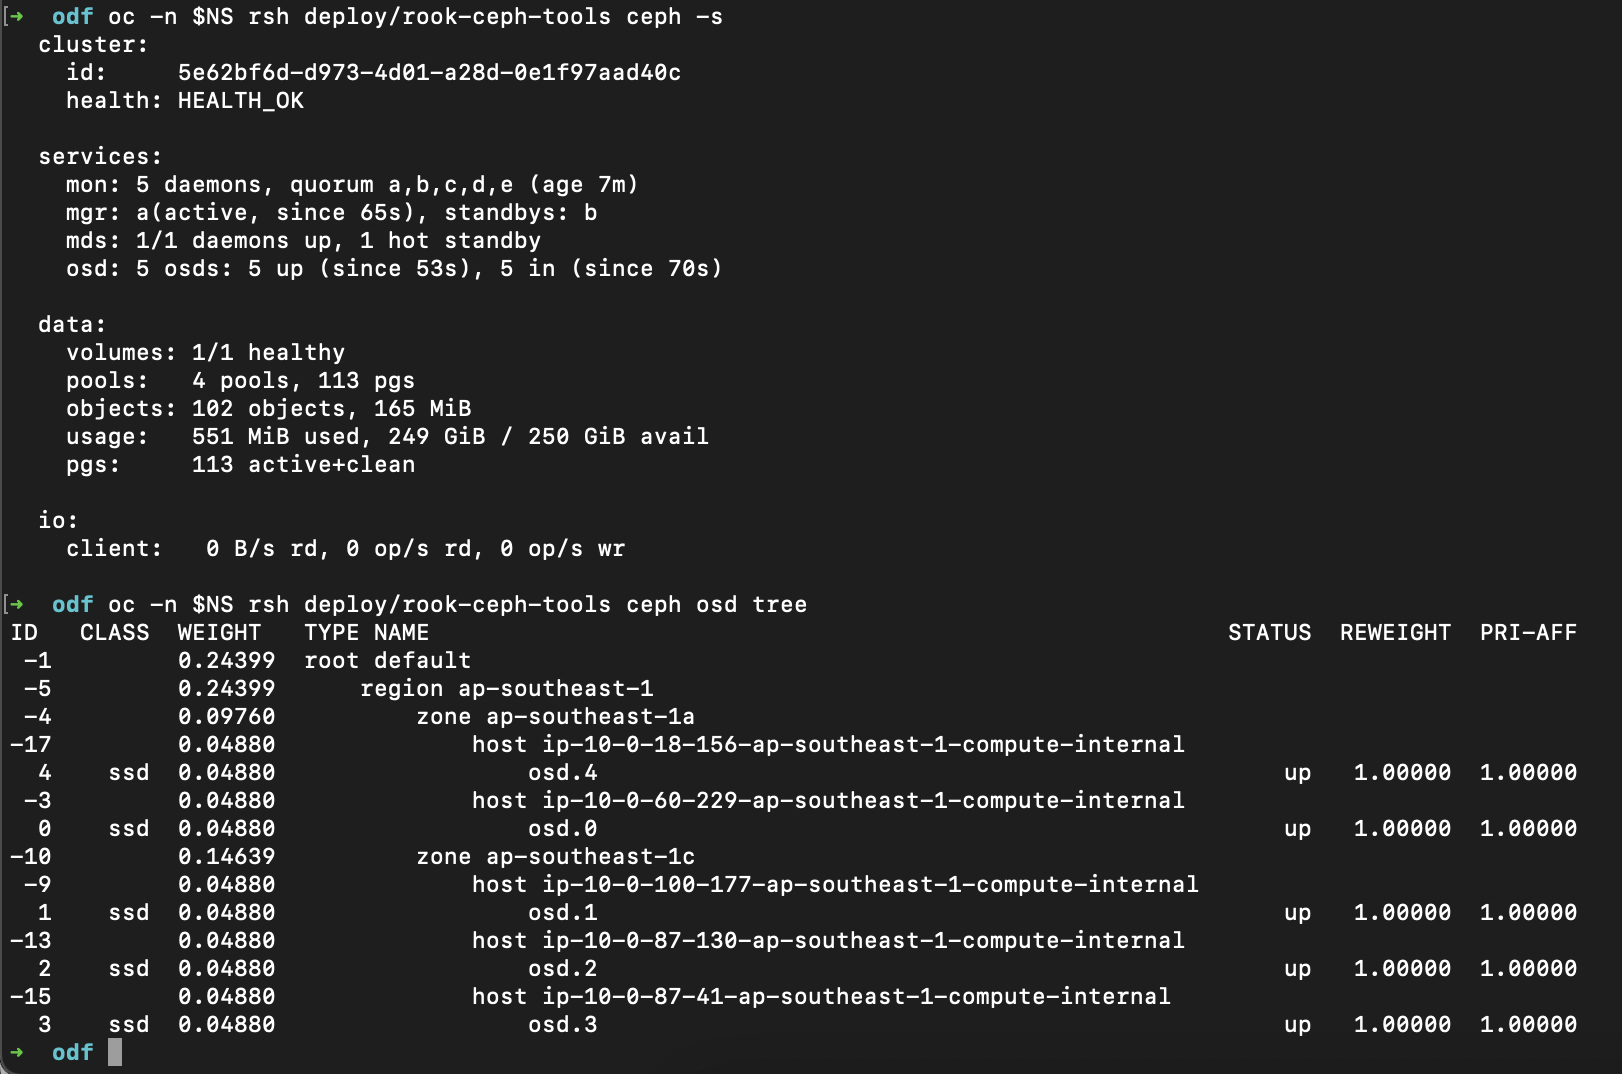
Now i have 250GB back.
Troubleshooting
Now if you encounter issues where ceph is not able to claim the disk, i did the following:-
- scale down rook-ceph-osd-<affected-osd-id>
- delete deploy/rook-ceph-osd-<affected-osd-id>
- delete the PV & PVC, and wipe the disk
- wait for LSO to adopt the disk again within a few seconds
- rollout restart deploy/rook-ceph-operator